What is localhost phpmyadmin
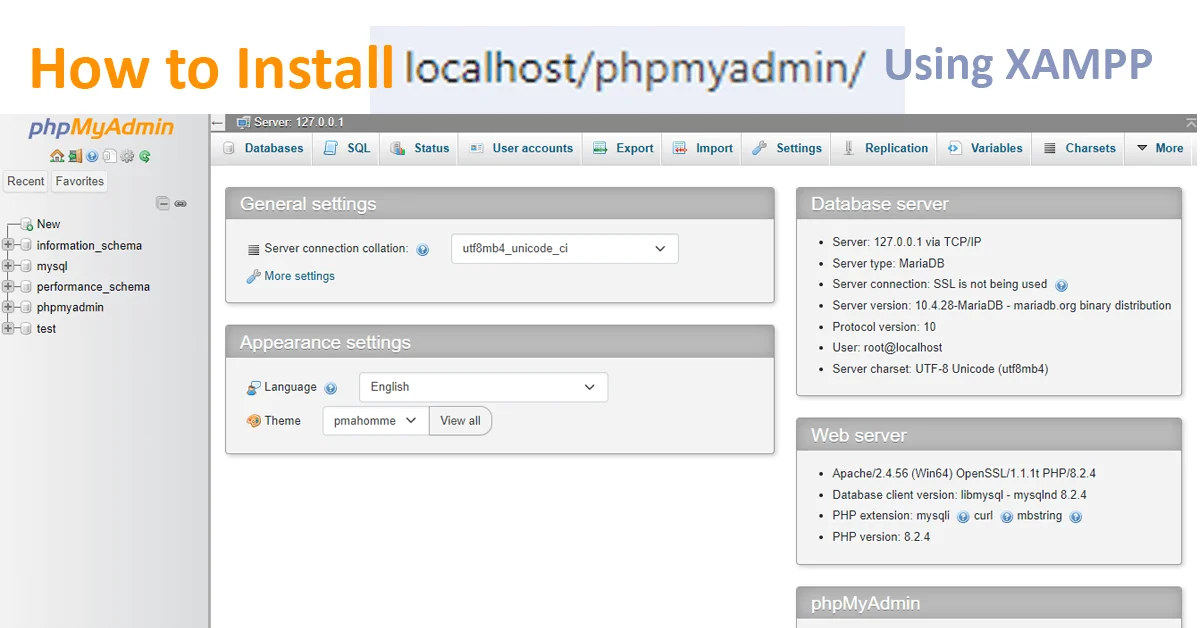
Localhost/phpMyAdmin is a web-based database tool that is used for managing MySQL and MariaDB databases. It is written in the PHP programming language, which is available as an open-source tool.
PhpMyAdmin allows a wide range of DB operations, like:
- Creating & Modifying Tables
- Creating & Modifying Rows
- Importing & exporting data
- Running SQL queries
- Managing users and more
By installing PhpMyAdmin on a web server, it can be accessed using any web browser, like Google Chrome, Mozilla Firefox, and more. by following the URL: http://localhost/phpmyadmin.
In other cases, if it is installed on some other port, like 8080, the URL can be accessed at http://localhost:8080/phpmyadmin.
phpMyAdmin has a wide range of features
- Database administration
- Table administration
- SQL query editor
- Graphics
- Multiple server support
- Managing Data
How to Install localhost/phpMyAdmin on Your Windows
Step 1: Downloading XAMPP
It is a free, cross-platform web server stack package that is open source. It provides all important components for the development and testing of dynamic web applications. It is a popular choice for developers as it is easy to use and has a cross-platform web server stack that is also secure.
For Downloading XAMPP visit: ApacheFriends.Org and download the suitable version for your Operating System.
If you’re anywhere facing issues in configuring your WiFi router, Read this article: 192.168.0.1 Login Admin
Step 2: Installing XAMPP


Step 3: Running XAMPP webserver to use phpMyAdmin


As phpmyadmin used the default port 80, if it was already used in your system, it would show sometimes an error.

To change the default port used by phpmyadmin, you need to click on Config => Apache (httpd.conf).


Conclusion
Congratulations, you have successfully installed phpMyAdmin on your Windows computer!
With phpMyAdmin, you can easily manage your MySQL databases.
To access phpMyAdmin, simply open a web browser and type http://localhost/phpmyadmin into the address bar after starting apache and mysql from XAMPP server
We hope this blog post has been helpful. If you have any questions, please feel free to leave a comment below.
Trouble Shooting Guide
Issue running XAMPP MySQL without Administrator permission – Port 3306 not showing and Access Denied on localhost/phpmyadmin
- Try Running your Xampp from start menu to “Run As Administrator”

2. Check your port: If your default port is busy and used by something else, you need to change the default port to another, like 8080 or more.
Open the XAMPP Control Panel, then click on Netstat to check which port it is using.


How to change XAMPP apache server port?
click on Config => Apache (httpd.conf).


Here change the port number to 8080 or 8888 and save the file
After initiating the XAMPP Server, access the URL http://localhost:8080/phpmyadmin/ or replace “8080” with the new port number you are using.
How To Open PHP MyAdmin?
Refer the above article for detailed steps on How to Install XAMPP server and use PHP MyAdmin
Can we get PHP MyAdmin in CPanel?
Yes, you can add PHP MyAdmin in CPanel.